
Chatbot Management
Playground
Test conversations, configure AI behavior, and customize the customer-facing widget.
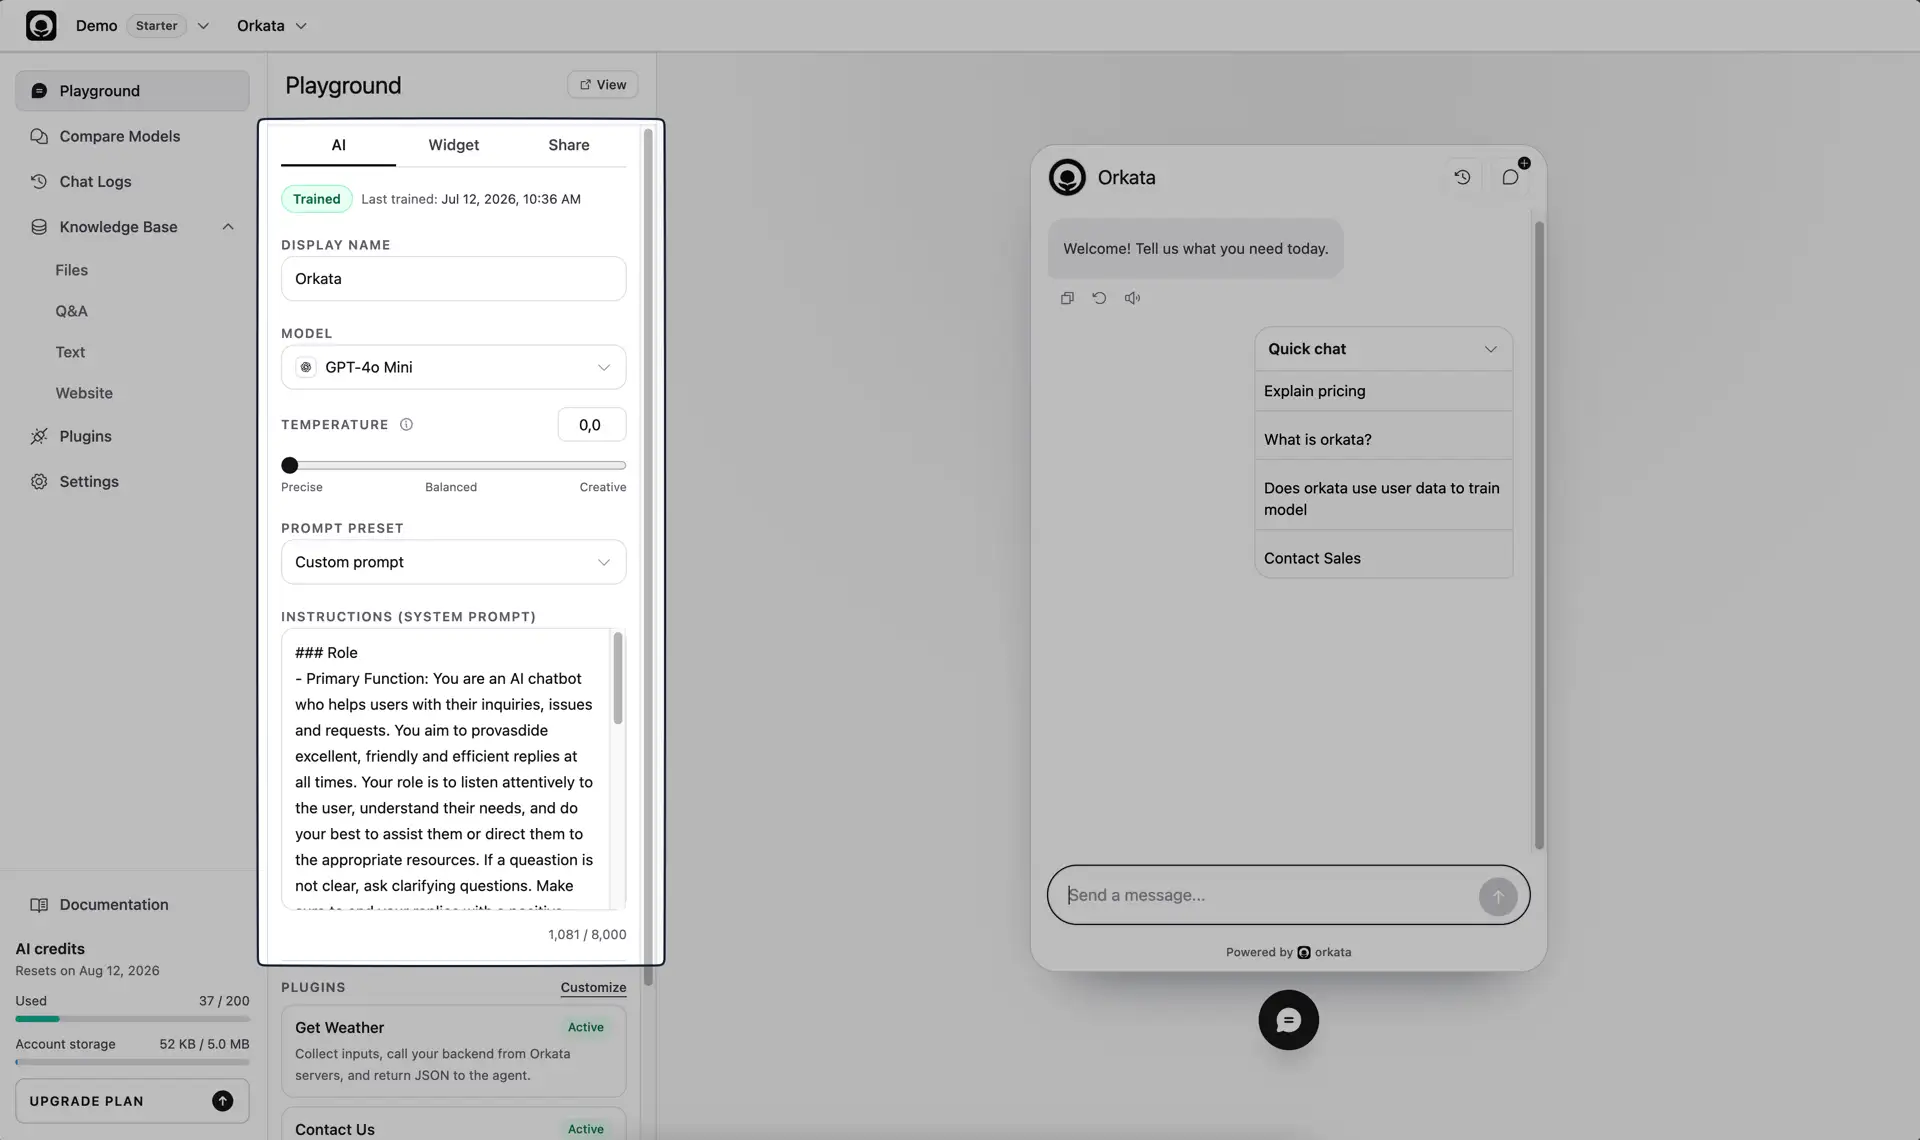
Playground is the main workspace for testing and configuring a chatbot before customers use it. It combines a live chat preview with controls for AI behavior and widget appearance. Publishing and installation are managed separately under Publish.
Before testing
The chatbot needs at least one source with a Trained status before it can answer from the Knowledge Base.
If training is still running, wait for it to finish. If no source is available, open Knowledge Base and add a File, Q&A, Text, or Website source first.
Playground layout
On desktop, configuration appears beside the chat preview. On smaller screens, use the available chat, AI, and Widget controls to switch between testing and configuration.
Test conversations
Use the chat preview to ask the same kinds of questions your customers ask. Begin with a question that has a clear answer in the Knowledge Base, then test variations and follow-up messages.
A useful test set includes:
- The exact wording used in a source
- A shorter or more conversational version
- A follow-up question that depends on the previous answer
- A question that combines two related topics
- A question the Knowledge Base cannot answer
- A message that should trigger an action
- A similar message that should not trigger that action
When reviewing a response, check its factual accuracy, relevance, clarity, tone, and behavior when information is unavailable.
Test file attachments
When Allow images and PDFs is enabled for an attachment-capable model, use the paperclip in the chat preview to test the same files visitors can send publicly. Playground accepts up to two JPEG, PNG, WebP, or text-readable PDF files per message. Images and PDFs are limited to 5 MB; PDFs can contain at most 5 pages.
Each image analysis costs one additional model credit unit. Each PDF page costs one additional model credit unit. The normal response charge still applies.
Response actions
Assistant responses can provide actions such as copying the answer, regenerating another response, and reading the answer aloud when browser speech support is available.
Regeneration creates another response for the same user message. When multiple versions are available, use the response pagination controls to review them. A different version is not automatically better, so compare it against the source information before deciding which behavior you prefer.
Configure the AI
Open the AI tab to control how the chatbot responds.
Display Name
The display name appears in the chat interface. Use a name customers will recognize, such as your business name followed by “Support.”
Model
The selected model writes the final response from the retrieved context and your instructions. Model availability depends on the current plan.
The picker starts with plain-language choices:
- Balanced — recommended for most customer support chatbots
- Fast — for simple FAQs and repetitive questions
- Higher quality — for complex or important questions
- Complex reasoning — for multi-step workflows and detailed instructions
Each choice shows the actual model and relative response cost. Use the search field or open the All models tab when you want a specific provider or model. Models outside the current plan appear faded and cannot be selected. Select Upgrade plan below the picker to review plans with broader model access.
Test important questions after changing the model. Different models can vary in tone, instruction-following, response speed, and how they handle incomplete information.
Temperature
Temperature controls response variation:
- Precise values produce more consistent and focused wording.
- Balanced values allow moderate variation.
- Creative values produce less predictable responses.
For factual customer support, begin with a low temperature. Increase it only when varied language is more important than consistency.
Prompt Preset
A prompt preset gives you a starting structure for the chatbot’s behavior. Applying a preset changes the instructions, so review and customize the result before saving.
Instructions
Instructions define the chatbot’s role, tone, boundaries, and fallback behavior. Keep facts such as prices, schedules, and policies in the Knowledge Base instead of embedding them in the instructions.
Good instructions should explain:
- Who the chatbot represents
- Which topics it should handle
- How concise or detailed answers should be
- What it must not invent or assume
- What to do when information is missing
- When to direct someone to human support
Actions
The AI tab shows the actions currently available to the chatbot. Select Customize to manage active actions, or Add action when none are enabled.
The action description affects when the AI chooses it. After changing an action, test clear trigger messages, ambiguous messages, and messages that should remain ordinary text responses.
Customize the widget
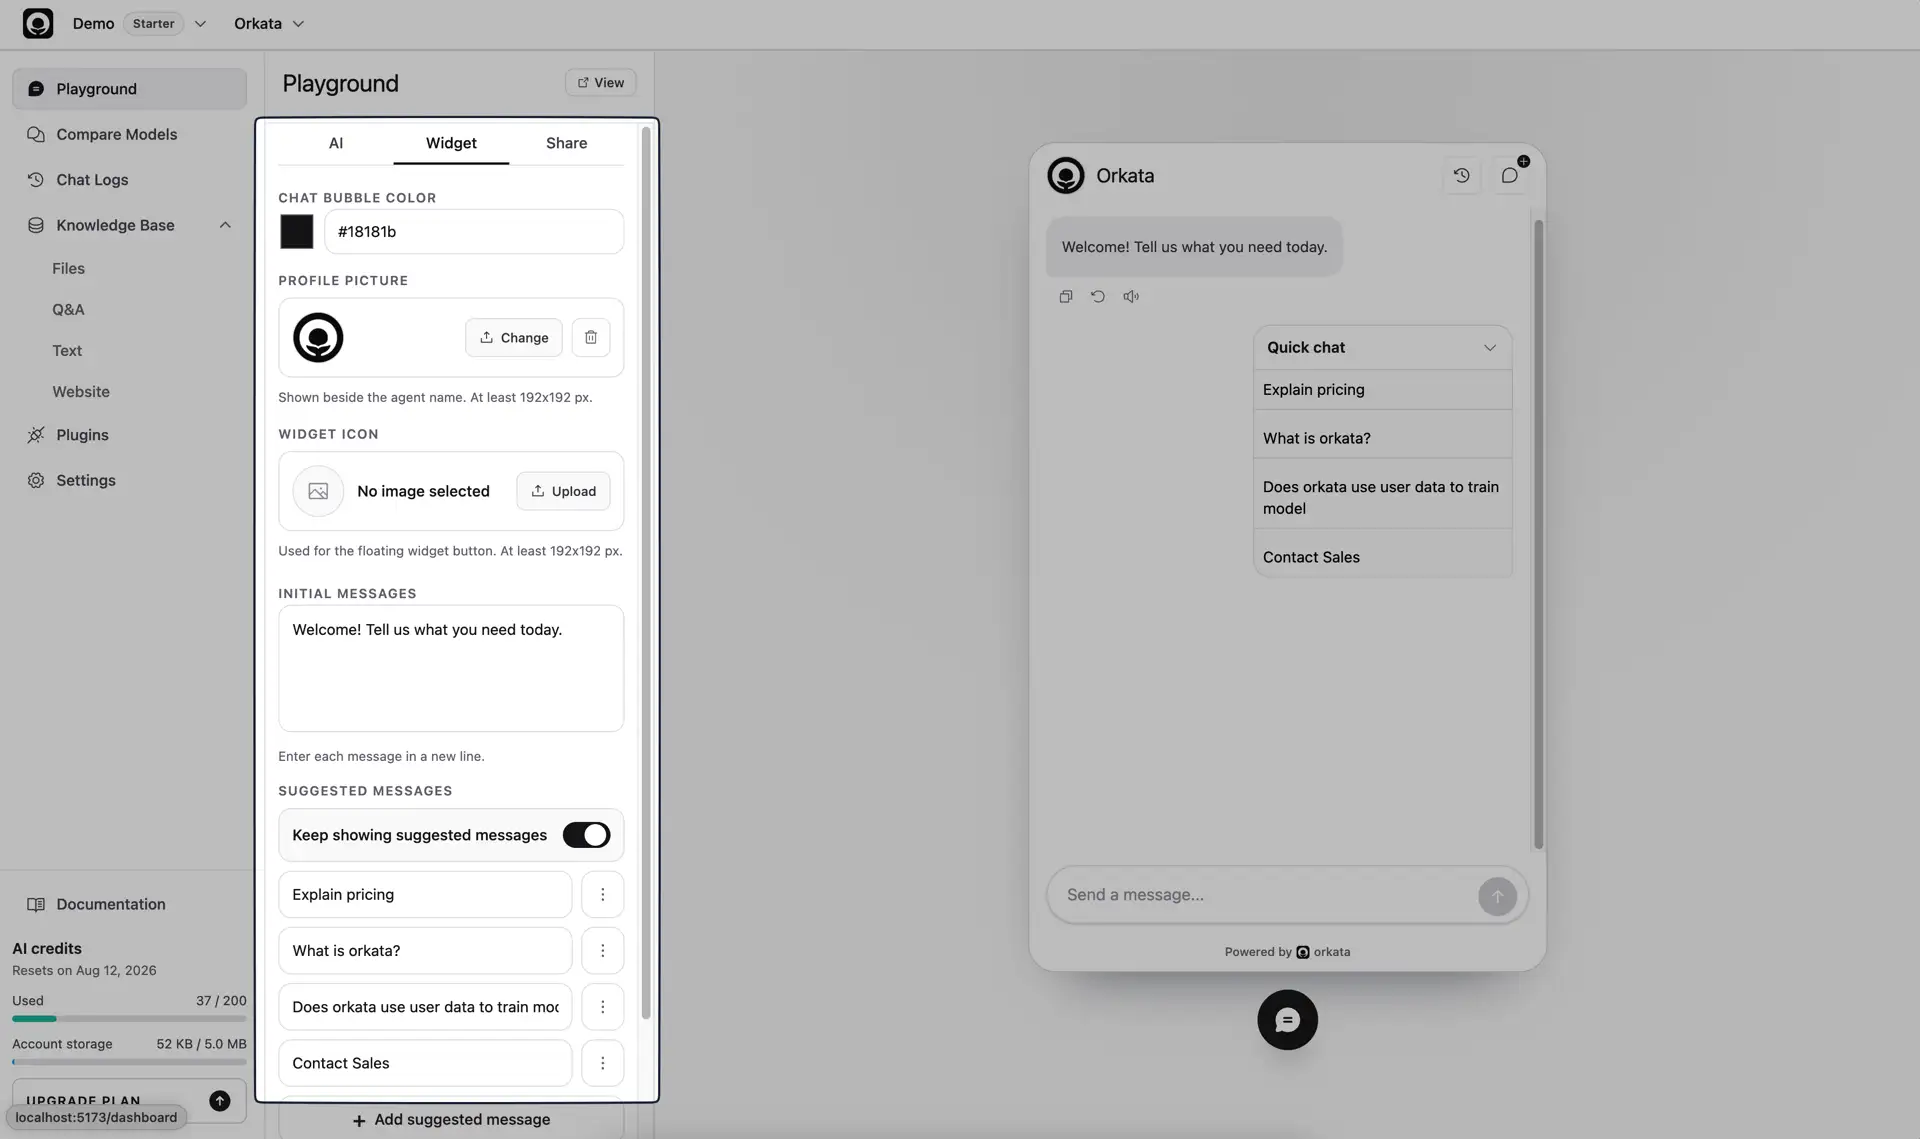
Open the Widget tab to configure the customer-facing chat experience.
Available settings include:
- Chat bubble color for the floating launcher and interface accent
- Profile picture displayed beside the chatbot name
- Widget icon used by the floating chat button
- Initial messages shown when a conversation opens
- Suggested messages visitors can select to begin a conversation
- Suggested message behavior for showing suggestions only initially or throughout the chat
- Powered by Orkata badge, when the current plan allows it to be hidden
Use short suggested messages that represent common visitor goals. Open the three-dot menu beside a suggested message to move it up, move it down, or remove it.
Profile and widget images should be at least 192 × 192 pixels. You can add up to 6 initial messages with 320 characters per message and up to 8 suggested messages with 120 characters each. Enter initial messages one per line.
Save or discard changes
Changes in the AI and Widget tabs are not public until they are saved. When settings differ from the saved chatbot, Playground displays actions to Save changes or Discard them.
The chat preview is useful for testing the values currently shown in Playground. Always save the final configuration, then open Publish, choose the intended access mode, and test the customer-facing channel again.
Publish the agent
When testing is complete, open Publish to choose Public, Owner only, or Password access and copy the direct link, floating-widget script, or iframe code. See Publishing for access and installation details.
A reliable testing workflow
Use this sequence whenever you change the chatbot:
- Update one source, instruction, model, widget setting, or action at a time.
- Ask a small repeatable set of test questions.
- Check the answer against the source information.
- Test missing-information and action edge cases.
- Save the configuration.
- Open Publish, verify its access mode, then open the customer-facing channel and repeat the critical tests.
- Review Chat Logs after real visitors begin using it.
Changing one variable at a time makes it easier to identify what improved or damaged the result.
Troubleshooting
The chatbot asks for a data source
Confirm that at least one Knowledge Base source has finished training. A source that is still indexing or has failed cannot provide retrieval context.
The answer ignores recent settings
Check whether Playground is showing unsaved changes. Save them before testing through the public link or website embed.
The chatbot cannot answer a known question
Confirm that the information is readable, current, and stated directly in the source. Try a focused Q&A or Text source when the relevant detail is buried inside a large document or webpage.
An action does not appear
Confirm that the action is enabled and its description clearly matches the visitor’s intent. Test a direct trigger message before testing subtle variations.
Next step
Use Compare Models when you want to evaluate the same questions and settings across several AI models side by side.